Advice and answers from the GetReviews.ai team
Surveys
A survey is what your customer completes after purchase. Customers can complete a post-purchase survey, access eligible offers, and optionally continue to a review destination. Leaving a review is voluntary and not required to receive an offer. A survey is made up of 4 sections: Survey Settings, Analytics, Integrations, and Additional Survey Settings. Let's go over the details of each section below.
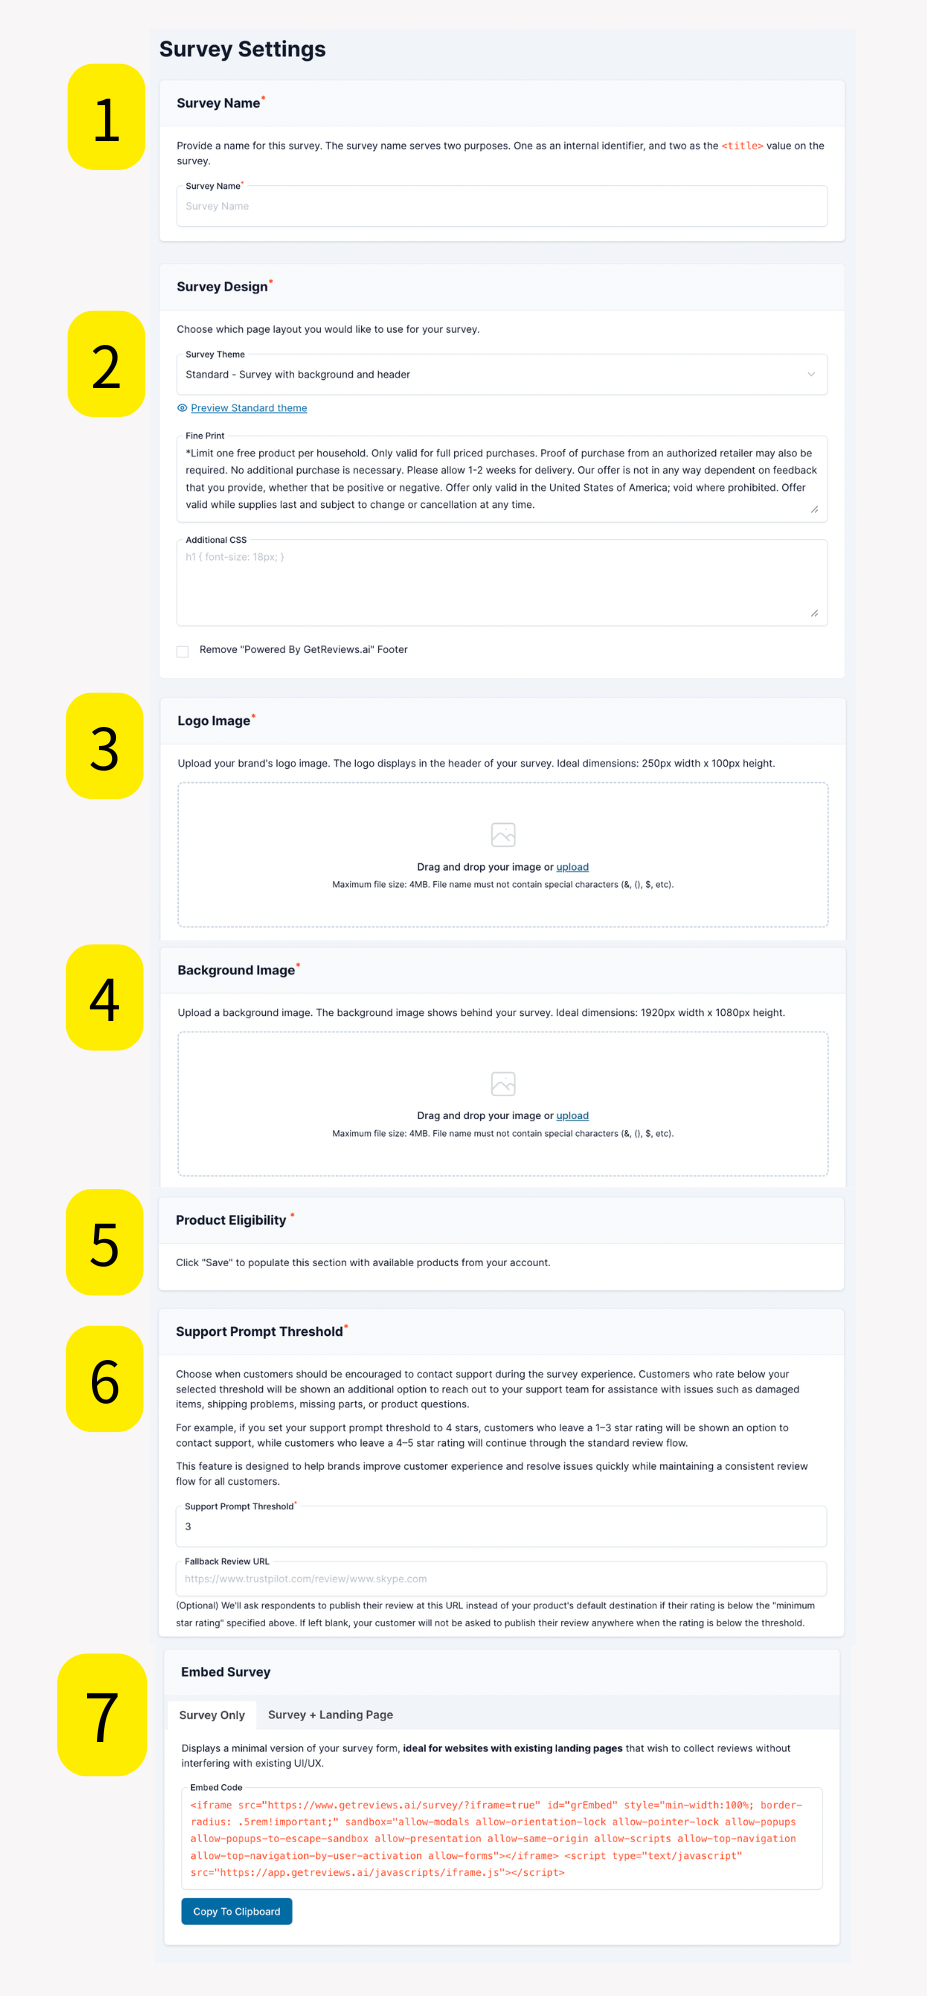
Survey Settings
-
Survey Name
: The survey name is a way for you and your customer to identify this survey. The survey name shows on the "Surveys" page on GetReviews, as well as in the browser tab (seen below.)
- Survey Design : There are three survey themes to choose from, each with its own set of visual layout styles. To explore your options, simply select a theme from the dropdown menu to instantly preview how it will look on your survey. Keep in mind that your theme selection is never permanent — you can always return to this setting and switch to a different theme at any time.
- Logo Image : Add your brand's logo by dragging and dropping an image file directly into the upload area. For best results, we recommend using an image that is 250px wide by 100px tall. Please note that the file name must not contain any special characters, as this may prevent the file from uploading correctly.
- Background Image : Add a background image by dragging and dropping an image file directly into the upload area. For best results, we recommend using an image that is 1920px wide by 1080px tall. Please note that the file name must not contain any special characters, as this may prevent the file from uploading correctly. We recommend uploading a simple background image, such as one with a solid color, as on mobile devices, the background image is not well shown.
-
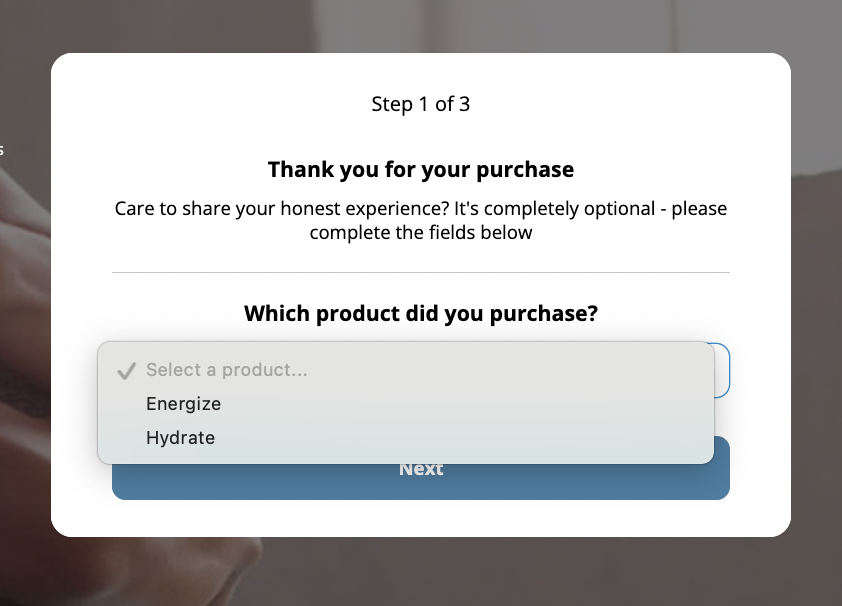
Product Eligibility
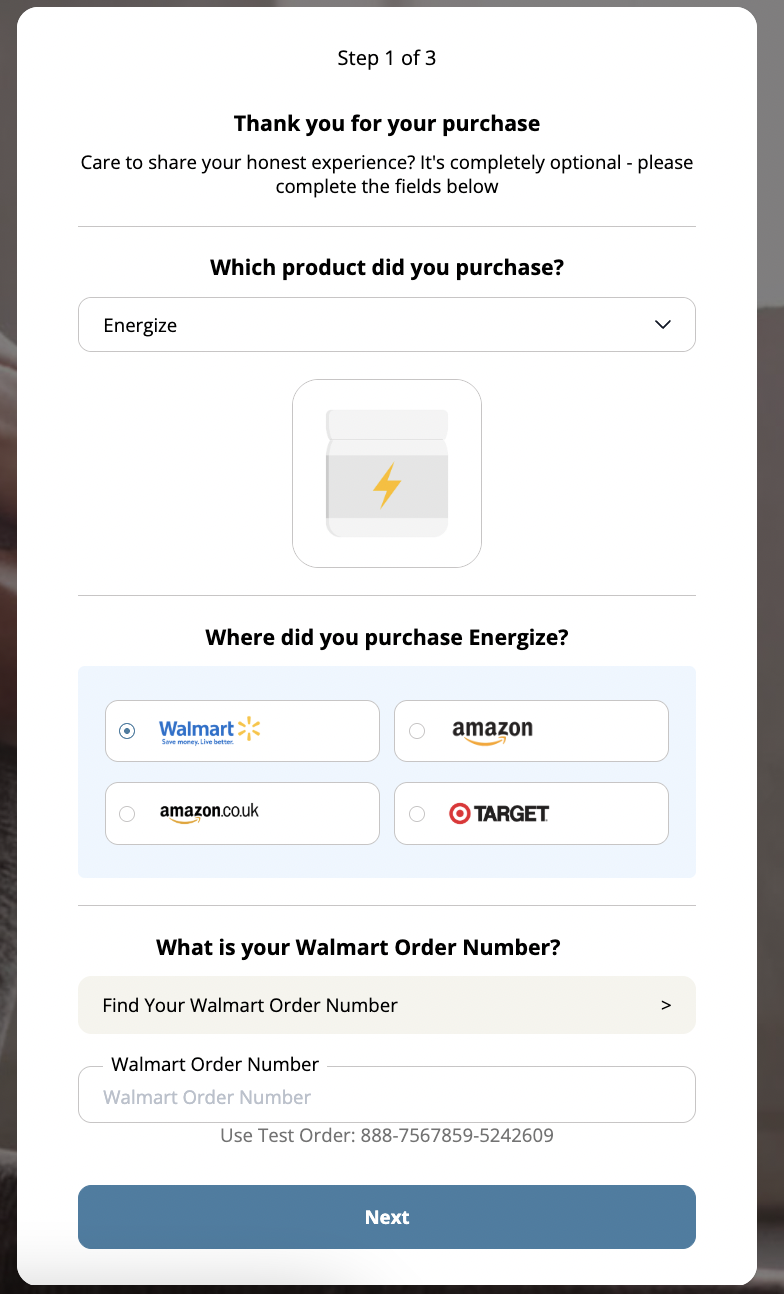
: Making a product eligible on a survey allows anyone who has purchased the product you are enabling to complete the post-purchase survey and access eligible offers. If only one product is enabled, there will be no dropdown menu and your one product will automatically be shown. If more than one product is enabled, a dropdown menu will be shown and the customer will be able to select which product they have purchased. See example below.
If you've only enabled one marketplace for your product such as Amazon US, the next follow-up question of "Where did you purchase [product name]? will not be shown since you only enabled one marketplace for that product. If you've enabled multiple marketplaces for the product, the next follow-up question of "Where did you purchase [product name]?" will be shown and the marketplaces you've enabled for the product. Your customer will be able to choose which marketplace they purchased it from.
-
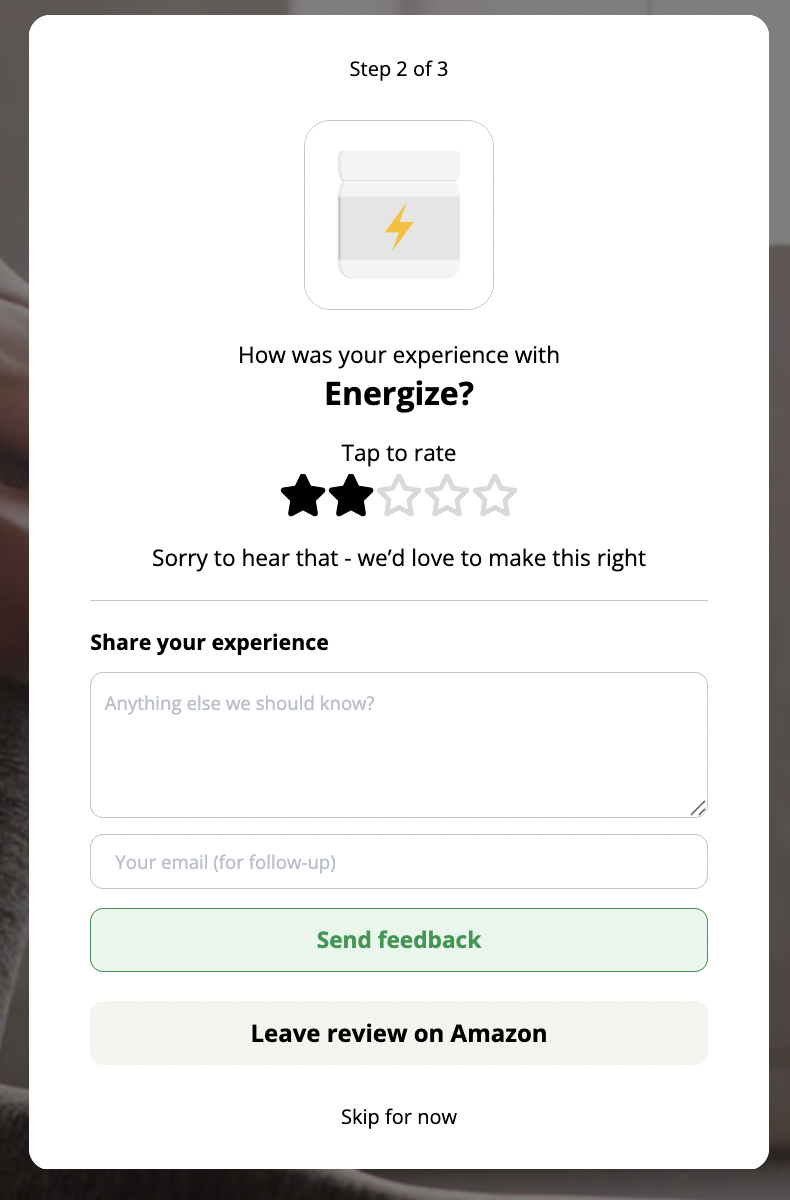
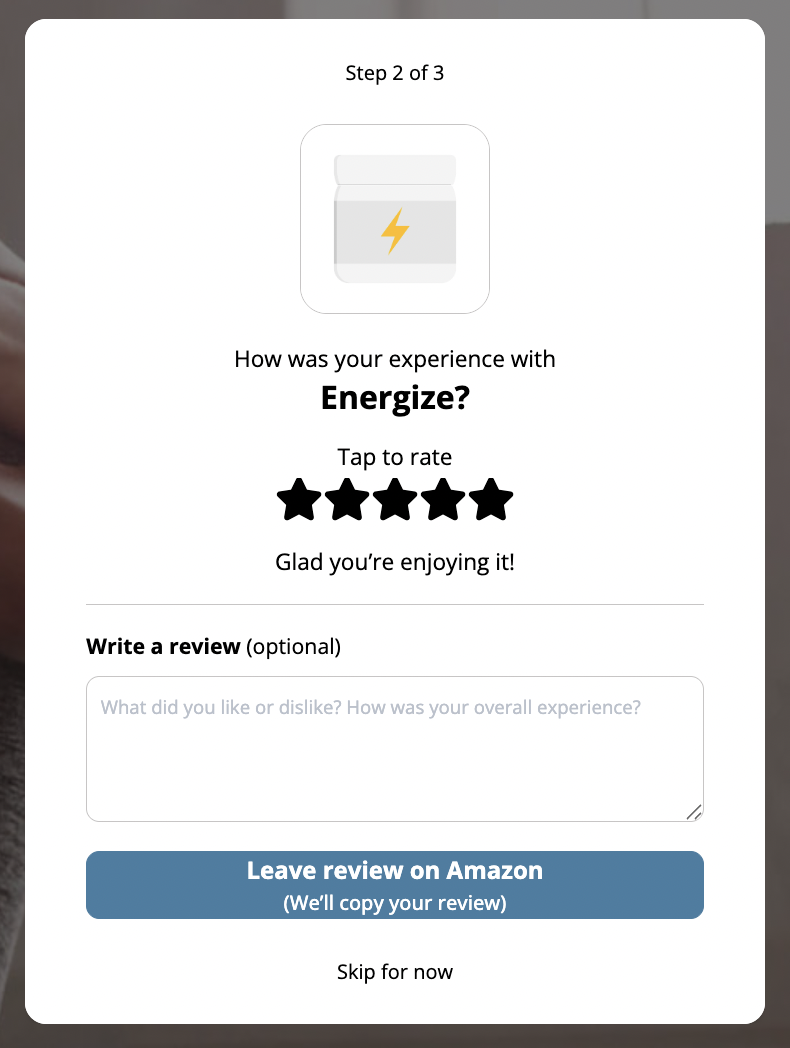
Support Prompt Threshold
: Choose when customers should be encouraged to contact support during the survey experience. Customers who rate below your selected threshold will be shown an additional option to reach out to your support team for assistance with issues such as damaged items, shipping problems, missing parts, or product questions.
For example, if you set your threshold to 4 stars, customers who leave a 1–3 star rating will be prompted to contact support. If you received feedback, an email with the feedback, timestamp, and the customer's e-mail address will be automatically sent to the GetReview's account admin and members. See example below.
While those who leave a 4–5 star rating will continue through the standard review flow. See example below.
- Embed Survey : Once you have saved your survey, an option will appear beneath the survey settings that gives you your survey's embed code. Embed codes give you the ability to paste your GetReviews survey on custom domains. This can be your business website or a dedicated domain name specifically for your survey.
Analytics
Analytics allows you to insert tracking pixels into your survey. This is great to analyze traffic coming into your survey, as well as to build dynamic marketing audiences for platforms like Google & Facebook. There are four areas where you can place tracking pixels: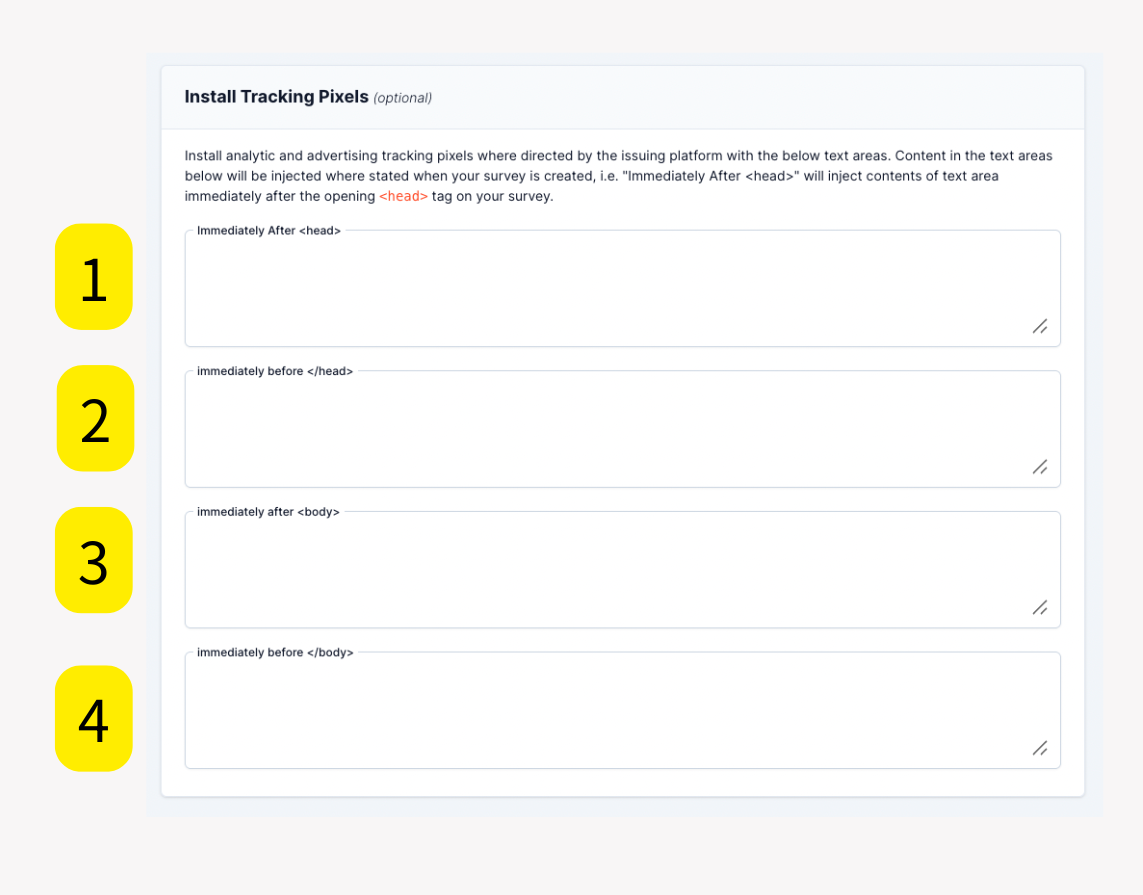
- Code Slot 1 : Code Slot 1 injects the contents of this text box immediately after the opening <head> tag on your survey.
- Code Slot 2 : Code Slot 2 injects the contents of this text box immediately before the closing </head> tag on your survey.
- Code Slot 3 : Code Slot 3 injects the contents of this text box immediately after the opening <body> tag on your survey.
- Code Slot 4 : Code Slot 4 injects the contents of this text box immediately before the closing </body> tag on your survey.
Integrations
Integrations is a two-part process. First, you will need to enable the integrations you would like to utilize on this survey in your integrations library . Once you have enabled the integrations you would like to utilize, return to your survey and you will notice an option has appeared for the integration(s) that you enabled.Second, to enable an integration on your survey, you will need to tick the box next to the integration you would like to enable, and, if there are additional settings required by the integration, then you will need to fill these out as well.
Note: Integrations fire conditionally based on the validation method you have set for the marketplace of the completed survey. For example, if the customer is completing your survey for their Amazon purchase, and you have set Amazon to manual validation , then the integrations enabled on this survey will not fire until you have validated the customer's review. However, if Amazon is set to automatic validation and the customer enters an order number that exists in your order number database, then they are automatically validated and your integrations will fire immediately once the customer finishes the survey.

Additional Survey Settings
In addition to the standard configuration options, there are additional survey settings available that allow you to further customize the settings of your survey page to better fit your needs.- Custom Domain : Adding a custom domain allows you to replace the default survey URL with your own branded domain, creating a more professional and seamless experience for your respondents. Learn more here.
- Enable Review Keywords : Adding review keywords uses AI to identify common themes from existing reviews and displays them as helpful prompts on your review form, making it easier for customers to leave meaningful feedback. Learn more here.
- Enable Social Proof : Enabling social proof uses AI to display motivating messages to survey visitors, showing how impactful their review could be. Learn more here.
- Time Delay : Time delay sets the number of days after a purchase before a customer can participate in your survey, and any customer who tries to submit a review early will be notified of how many days remain before they are eligible. Learn more here.
- Collect Cell Phone Number? : Enabling this optional setting allows you to collect your customer's cell phone number as part of the survey completion process.
- Collect Review Title? : Enabling this optional setting adds a separate field for customers to include a title with their review. This is only recommended for those using the Bazaarvoice integration.
- Collect Country? : Enabling this optional setting adds a separate field to collect your customer's country, which is useful for sorting exported responses for giveaways or promotions that require physical address information.
- Redirect on Finish? : Enabling this optional setting will automatically redirect customers to a URL of your choice upon survey completion instead of displaying the standard 'Thank you' page, just be sure to include http:// or https:// in your URL to avoid a broken redirect.
- Automatic marketing opt-in? : Enabling this optional setting will automatically opt customers into marketing communications without displaying the 'Ok to contact me with other offers' checkbox, though it is recommended to include wording to this effect in your fine print.
- Block words/phrases : Enabling this optional setting allows you to block specific words or phrases from being used in customer reviews.
- Ask Additional Qualitative Questions : Asking additional qualitative questions can help you gather more detailed feedback about your product. Learn more here.
- Survey Strings : Editing the survey strings is an optional setting that allows you to customize the wording and text displayed throughout your survey to better match your brand's voice and language. Learn more here.